Dear QLC+ users, I started to write this technical doc about Loopback Universes some months ago, during my exploratory work on the capabilities of the Loopback plugin.
When I noticed the Loopback plugin was still mysterious or even magic for some users, I decided to finalize this doc and share it with the QLC+ community, hoping it could help new users to demystify this feature and also bring some ideas and useful information to more advanced users.
Here are the main topics addressed by this doc:
QLC+ virtual setup on Loopback Universe
Virtual fixtures on Loopback Universe.
Benefits of a virtual setup on Loopback Universe:
- more flexible controls in QLC+ operate mode,
- reusability in various environments.
Virtual Workspace.
Virtual Controller.
Virtual setup architecture.
As a bonus, this doc is also touching other side topics previously raised on the forum:
- Configurable color palette in kiosk/operate mode
- Using Hue-Saturation color system
- WebSocket API.
This Google doc is open to any comment, suggestion or question that can contribute to improving its quality, via the "Add comment" button or "Suggesting" mode.
Thierry
QLC+ user since 2019
https://sites.google.com/view/ingeson
Loopback magic - Extending the Virtual Console capabilities thanks to Virtual Controllers
-
thierry
- Posts: 11
- Joined: Thu Sep 05, 2019 10:07 pm
- Location: Namur - Belgium
- Real Name: Thierry Demonty
- Contact:
-
GGGss

- Posts: 2732
- Joined: Mon Sep 12, 2016 7:15 pm
- Location: Belgium
- Real Name: Fredje Gallon
Woow Merçi Thierry,
A very nice attribution to this forum. I still need to read it through.
We could ask @yestalgia to add the link to the documentation.
A very nice attribution to this forum. I still need to read it through.
We could ask @yestalgia to add the link to the documentation.
All electric machines work on smoke... when the smoke escapes... they don't work anymore
-
GGGss
- Posts: 2732
- Joined: Mon Sep 12, 2016 7:15 pm
- Location: Belgium
- Real Name: Fredje Gallon
I did a preliminary review of the supplied doc... Nice work Thierry, but as stated in my comments, the structure of the doc needs some love and caring IMHO.
To the other (power) users: please review and add comments to your liking. I have the feeling we are on the edge of a very interesting documentation about the Loopback Magic.
To the other (power) users: please review and add comments to your liking. I have the feeling we are on the edge of a very interesting documentation about the Loopback Magic.
All electric machines work on smoke... when the smoke escapes... they don't work anymore
-
hansjuergen
- Posts: 20
- Joined: Fri May 08, 2020 6:45 pm
- Real Name:
Thanks for putting this up. I have a big benefit in using the virtual colors and positions in synchronizing my shows.
Note that I have an open pull request #1422 to make that setup even more useful in adding access to these colors to RGB matrices which so far only have dropdown color selections and comment there if you could make use of it:
Note that I have an open pull request #1422 to make that setup even more useful in adding access to these colors to RGB matrices which so far only have dropdown color selections and comment there if you could make use of it:
-
Yestalgia
- Posts: 371
- Joined: Thu Jun 17, 2021 9:31 am
- Location: Australia
- Real Name:
- Contact:
This is a great resource and I can't stress enough how much it helps when people go to these lengths.
When we have a structure agreed on, I'd like to explore adding some of this detail to the QLC+ 4 loopback plugin documentation
In addition, some example workspaces with basic through to advanced use cases covered.
When we have a structure agreed on, I'd like to explore adding some of this detail to the QLC+ 4 loopback plugin documentation
In addition, some example workspaces with basic through to advanced use cases covered.
This link doesn't seem to work?thierry wrote: ↑Wed Sep 27, 2023 8:54 pm Thierry
QLC+ user since 2019
https://sites.google.com/view/ingeson
-
MichelSliepenbeek
- Posts: 504
- Joined: Wed Feb 08, 2023 10:24 am
- Location: Nederland
- Real Name: Michel Sliepenbeek
One workspace with some easy use cases.
It shows:
1. The use of a loopback slider to control Level, Time, Pan and a Crossfader.
2. The use of two loopback Buttons, to scroll through a Multi Page Frame.
The example was set up to show what you can do with one slider.
In case you want to control Level you could use the "Catch up .."option.
In case you control Time, you set the Range in your Speed Dial.
In case you control Pan, of course you should add an extra slider for tilt.
In case you use the Crossfader option, don't forget to press Play (and Stop before you return to page 1).
For the Next - Previous Buttons i used arrows from the WingDings Character set (which is standard in Windows, but might not be available in other environments.)
I use a Sequence to set a loopback button (with a Low and a High scene) , because this is more stable (then using a simple scene).
Be aware that (in QLC4) you can use only one external control for each parameter of a Function, but you can use the same Loopback channel more than once as External Control for different Functions.
- Attachments
-
 Loopback-EasyExample.qxi
- (586 Bytes) Downloaded 238 times
-
- Loopback Easy Example.qxw
- (15.42 KiB) Downloaded 216 times
A QLC Workspace is like a Bob Ross painting: "it's your world, you can create whatever you want!"
-
MichelSliepenbeek
- Posts: 504
- Joined: Wed Feb 08, 2023 10:24 am
- Location: Nederland
- Real Name: Michel Sliepenbeek
Another workspace with some easy use cases.
This one shows:
2 sliders to control Pan and Tilt for Moving Heads (in absolute mode).
1 slider to control the size of the EXF's (you need to select one of the presets in the X-Y panel first to activate).
1 slider to control the speed of the EFX's.
To change the size of the working window of the EFX X-Y Pad, i effectively used 4 loopback sliders and used Channel Modifiers 0- 126 and 255 - 128.
The reason to use 4 sliders is to avoid the possibility of an overlap (on Virtual Console you cannot make the handles cross, but using External Inputs you can and when they do, you loose control).
As i'm limited in the number of attachments, i will add the rest in a following post.
Remark: this workspace is only meant as an example, so i did not set sensible ranges for Pan, Tilt and Speed. Feel free to change the values.
- Attachments
-
- Showtec_Kanjo-Wash-RGB.qxf
- (4.64 KiB) Downloaded 228 times
-
- Loopback Easy Example 2.qxw
- (24.32 KiB) Downloaded 175 times
-
- Loopback-EasyExample2.qxi
- (1001 Bytes) Downloaded 213 times
A QLC Workspace is like a Bob Ross painting: "it's your world, you can create whatever you want!"
-
MichelSliepenbeek
- Posts: 504
- Joined: Wed Feb 08, 2023 10:24 am
- Location: Nederland
- Real Name: Michel Sliepenbeek
Edit: i incidentally attached the wrong Channel Modifiers.
The correct ones, you will find here: viewtopic.php?p=72444#p72444
The Channel Modifiers:
The correct ones, you will find here: viewtopic.php?p=72444#p72444
The Channel Modifiers:
- Attachments
-
- Dimmer 128 - 255.qxmt
- (379 Bytes) Downloaded 215 times
-
- Dimmer 0 - 127.qxmt
- (375 Bytes) Downloaded 221 times
Last edited by MichelSliepenbeek on Mon Apr 01, 2024 9:32 am, edited 2 times in total.
A QLC Workspace is like a Bob Ross painting: "it's your world, you can create whatever you want!"
-
thierry
- Posts: 11
- Joined: Thu Sep 05, 2019 10:07 pm
- Location: Namur - Belgium
- Real Name: Thierry Demonty
- Contact:
Hello Fredje, thanks for this detailed review !GGGss wrote: ↑Thu Sep 28, 2023 8:57 am I did a preliminary review of the supplied doc... Nice work Thierry, but as stated in my comments, the structure of the doc needs some love and caring IMHO.
To the other (power) users: please review and add comments to your liking. I have the feeling we are on the edge of a very interesting documentation about the Loopback Magic.
I've replied to all your comments directly in the Google doc.
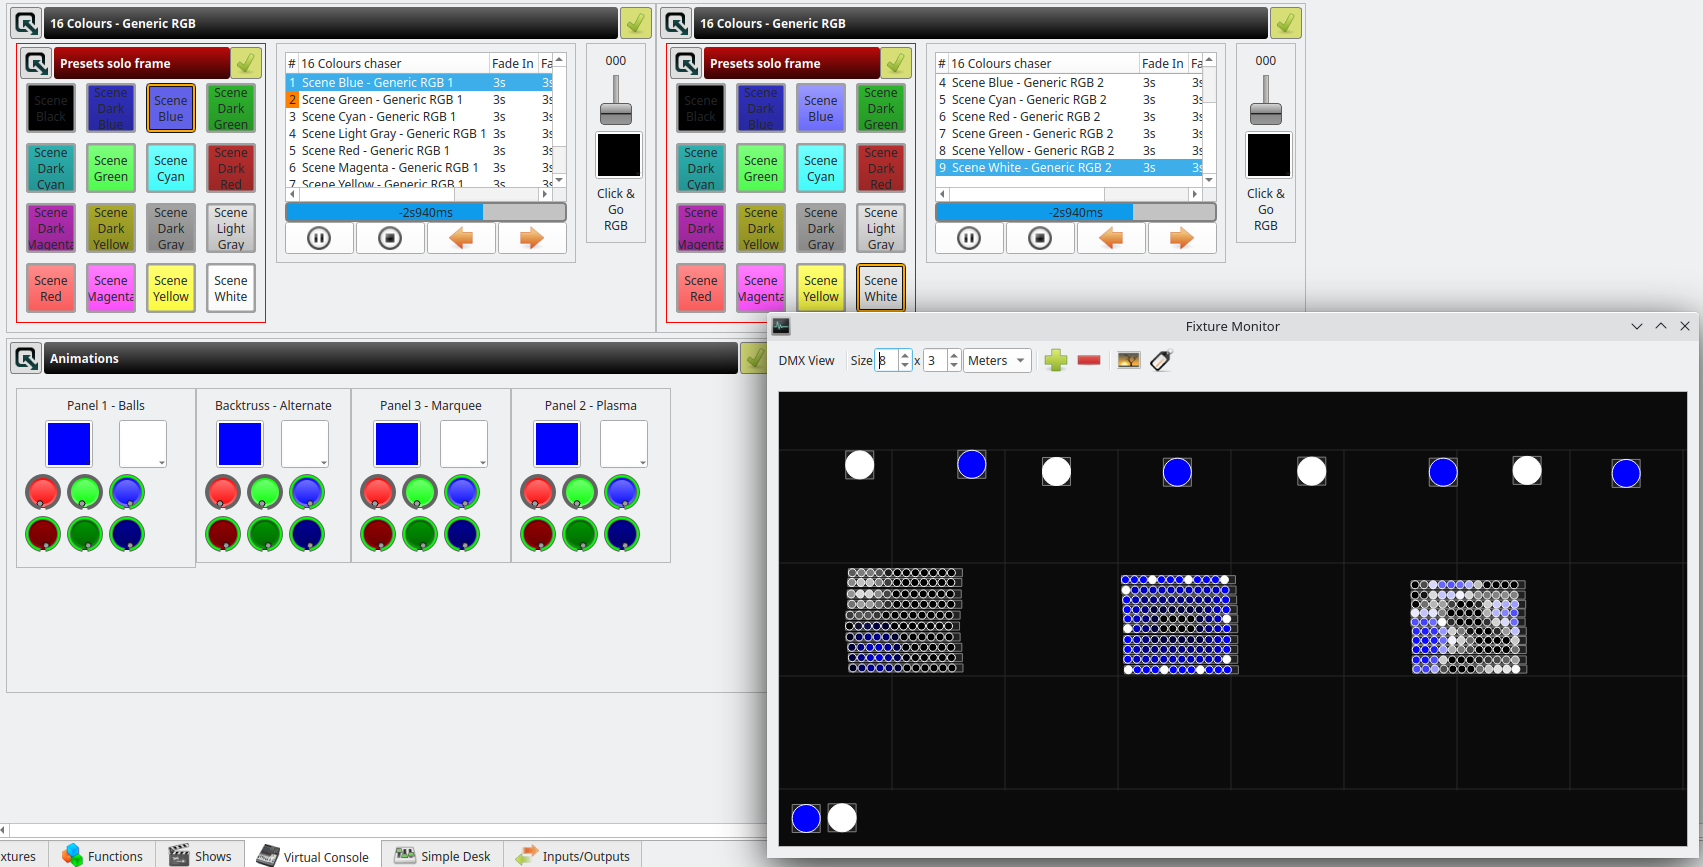
As you could read, the main objective of this doc is to introduce a new concept ("virtual controller") which can add new capabilities to the Virtual Console in Operate mode. For this purpose, I've added in the doc a screen shot of a User Control Frame for a simple type of Virtual Controller (RGB Color Configurator).
This document is not mean to be a detailed step-by-step user guide for a simple Loopback use case. However, I'm ready to contribute to such document if you think my contribution could be useful.
-
GGGss
- Posts: 2732
- Joined: Mon Sep 12, 2016 7:15 pm
- Location: Belgium
- Real Name: Fredje Gallon
As the Loopback Magic, for some, is the universal answer for internal 'rewiring' purposes, I think it's a big plus to give novice users an introduction to the matter.
It was in this mindset I reviewed your document.
Once you (we) got the basic content described as a step-by-step manual; you could add to the document the extension of the VC...
Those are my 2 cts.
It was in this mindset I reviewed your document.
Once you (we) got the basic content described as a step-by-step manual; you could add to the document the extension of the VC...
Those are my 2 cts.
All electric machines work on smoke... when the smoke escapes... they don't work anymore
-
MichelSliepenbeek
- Posts: 504
- Joined: Wed Feb 08, 2023 10:24 am
- Location: Nederland
- Real Name: Michel Sliepenbeek
The attached workspace is a further enhancement on Example 2.
It gives two examples of "controlling a Loopback Slider by another Loopback Slider".
In the widget on the right the second Loopback slider is used in Absolute Mode and provides the possibility to position the Speed slider (with Buttons).
The widget in the middle uses loopback Sliders in Relative Mode.
It is important to understand that a slider in relative mode is neutral with DMX value = 127.
With a higher value (> 127) it will make the related slider go up (increase), a lower value will make it go down (decrease). The more the value differs from 127, the faster the related slider will travel.
This will go on untill you set the Relative slider back to 127 (neutral).
I opted for using Flash Buttons, setting the sliders to LTP and having a scene active that sets the relative sliders (back) to 127. This scene is activated in the Start Up Routine ("green flag"on the Functions Tab).
When you push the Flash Button, the LTP logic will override the neutral values and when you release the button, this scene will ensure that the slider movement will stop.
(Be aware that if you use "Stop All Functions" you also kill this function. If your sliders will not stop moving use the "Active" Button on the top right of the frame to reactivate this function).
On my PC (i5) the values 109 (to decrease) and 145 (to increase) work fine. If your computer is faster/slower (or you are more/less patient then i am) feel free to change the values to your likings.
The buttons Horizontal and Vertical make it possible to restrict the movement to only Pan or only Tilt (make it a habbit to turn those functions off before you deactivate your EFX preset in the XY pad).
Left to the "EFX mode" label there is a minimise button that unveils the 8 sliders that perform the Loopback Logic (notice that i don't call it "magic" ).
).
If you really screw things up, set the first 4 to (about) 200 and the last 4 to (exact) 127.
In order to run this example you still need the channel modifiers that were attached with example 2.
I used character set Wingdings to produce the arrows that make the buttons "self explaining".
This character set is available in Windows, if it is missing on your Mac or Pi you need to find an alternative to make it look like this:
It gives two examples of "controlling a Loopback Slider by another Loopback Slider".
In the widget on the right the second Loopback slider is used in Absolute Mode and provides the possibility to position the Speed slider (with Buttons).
The widget in the middle uses loopback Sliders in Relative Mode.
It is important to understand that a slider in relative mode is neutral with DMX value = 127.
With a higher value (> 127) it will make the related slider go up (increase), a lower value will make it go down (decrease). The more the value differs from 127, the faster the related slider will travel.
This will go on untill you set the Relative slider back to 127 (neutral).
I opted for using Flash Buttons, setting the sliders to LTP and having a scene active that sets the relative sliders (back) to 127. This scene is activated in the Start Up Routine ("green flag"on the Functions Tab).
When you push the Flash Button, the LTP logic will override the neutral values and when you release the button, this scene will ensure that the slider movement will stop.
(Be aware that if you use "Stop All Functions" you also kill this function. If your sliders will not stop moving use the "Active" Button on the top right of the frame to reactivate this function).
On my PC (i5) the values 109 (to decrease) and 145 (to increase) work fine. If your computer is faster/slower (or you are more/less patient then i am) feel free to change the values to your likings.
The buttons Horizontal and Vertical make it possible to restrict the movement to only Pan or only Tilt (make it a habbit to turn those functions off before you deactivate your EFX preset in the XY pad).
Left to the "EFX mode" label there is a minimise button that unveils the 8 sliders that perform the Loopback Logic (notice that i don't call it "magic"
If you really screw things up, set the first 4 to (about) 200 and the last 4 to (exact) 127.
In order to run this example you still need the channel modifiers that were attached with example 2.
I used character set Wingdings to produce the arrows that make the buttons "self explaining".
This character set is available in Windows, if it is missing on your Mac or Pi you need to find an alternative to make it look like this:
- Attachments
-
- Loopback-EasyExample4.qxi
- (1.79 KiB) Downloaded 219 times
-
- Loopback Easy Example 4.qxw
- (59.56 KiB) Downloaded 133 times
-
A QLC Workspace is like a Bob Ross painting: "it's your world, you can create whatever you want!"
-
MichelSliepenbeek
- Posts: 504
- Joined: Wed Feb 08, 2023 10:24 am
- Location: Nederland
- Real Name: Michel Sliepenbeek
Another example can be found here: viewtopic.php?t=16710
You should go for the 5d version (at the bottom).
You should go for the 5d version (at the bottom).
Last edited by MichelSliepenbeek on Thu Oct 12, 2023 10:45 pm, edited 1 time in total.
A QLC Workspace is like a Bob Ross painting: "it's your world, you can create whatever you want!"
-
MichelSliepenbeek
- Posts: 504
- Joined: Wed Feb 08, 2023 10:24 am
- Location: Nederland
- Real Name: Michel Sliepenbeek
I use Loopback mainly to tidy up my virtual console .
In other words: give access to a load of functions in both an efficient way (by not taking up too much space) and an ergonomic way (by grouping the functions in a logical way).
I try to make the user interface as much "self explaining" as possible, in this case for instance by colorring the borders of the Cue Lists.
In the folowing example you can select a color in the bar on the left.
This will select the matching pages of two multi page frames (the Cue Lists are the same size as the Frames, so they fully cover the headers of the Frames).
For each Cue List there are two Speed Dials: one to control the Cue List (time to the next step of the chaser) and one to set the speed for the RGB Matrices.
Note that it is possible to launch more than one chaser at the same time (in fact you could even launch them all), i added a Button to Stop all the chasers at once.
In order to make the Button and the Borders for Rainbow to look as i intended, you'll need the attached JPG.
As i wanted to avoid any "noise" in this example, i made a copy of an existing workfile and deleted everything that was not relevant (would distract from understanding the logic).
This explains the gap in the numbers of the Loopback Channels.
Unfortunately i also deleted my Rainbow RGB Matrices, that's why those Cue Lists are empty. Apologies for that.
- Attachments
-
- Rainbow 1.jpg (4.96 KiB) Viewed 6816 times
-
- Loopback Easy Example 6.qxw
- (311.01 KiB) Downloaded 151 times
-
- Loopback-EasyExample6.qxi
- (2.83 KiB) Downloaded 202 times
A QLC Workspace is like a Bob Ross painting: "it's your world, you can create whatever you want!"
-
MichelSliepenbeek
- Posts: 504
- Joined: Wed Feb 08, 2023 10:24 am
- Location: Nederland
- Real Name: Michel Sliepenbeek
It should look like this:
- Attachments
-
-
A QLC Workspace is like a Bob Ross painting: "it's your world, you can create whatever you want!"
-
Xoneoo
- Posts: 8
- Joined: Sun Nov 19, 2023 6:58 am
- Real Name:
Hello Michel,
First of all, I want to say a big thank you for the work and patterns on the loopback logic.
I have been playing around with the "Loopback Easy Example 2".
The pan and tilt function worked right away, I had problems with the size function.
For the channel modifiers, the text says "0-126 and 255-128" (crossfade) but the files are for "0-127" and "128-255".
So these only shift the range in parallel.
After changing the modifier to "255-128" everything works fine.
(if one would like to have a minimum size then simply set an offset via the modifier, for example 0-120 & 255-135 )
maybe this information will help someone who, like me, is just getting into the depths of QLC+.
- Dimmer 255 - 128.qxmt
- (378 Bytes) Downloaded 13 times
-
MichelSliepenbeek
- Posts: 504
- Joined: Wed Feb 08, 2023 10:24 am
- Location: Nederland
- Real Name: Michel Sliepenbeek
Oops, big mistake.
I did attach the wrong Channel Modifiers.
Apologies for that.
These are the ones you need:
I did attach the wrong Channel Modifiers.
Apologies for that.
These are the ones you need:
- Dimmer 255 - 128.qxmt
- (379 Bytes) Downloaded 14 times
- Dimmer 0 - 126.qxmt
- (375 Bytes) Downloaded 16 times
A QLC Workspace is like a Bob Ross painting: "it's your world, you can create whatever you want!"
-
rajdude
- Posts: 11
- Joined: Tue Apr 16, 2024 2:34 pm
- Real Name:
Hello Thierry,
Thanks a lot for writing this document.
It seems to me this is a pretty hard concept to grasp. A newbie to stage lighting (like me) cannot wrap his head around it. There are so many concepts in there which are totally "alien" to a DJ or a regular person - e.g. what is a "Frame". Yeah, I had to look it up! but even after Google searching, an explanation does not come easy. I am an electrical engineer by training (although super duper rusty now, due to age) and I also work in IT, where hard concepts and documentation is the day-to-day fare....but I am finding this concept exceptionally difficult!
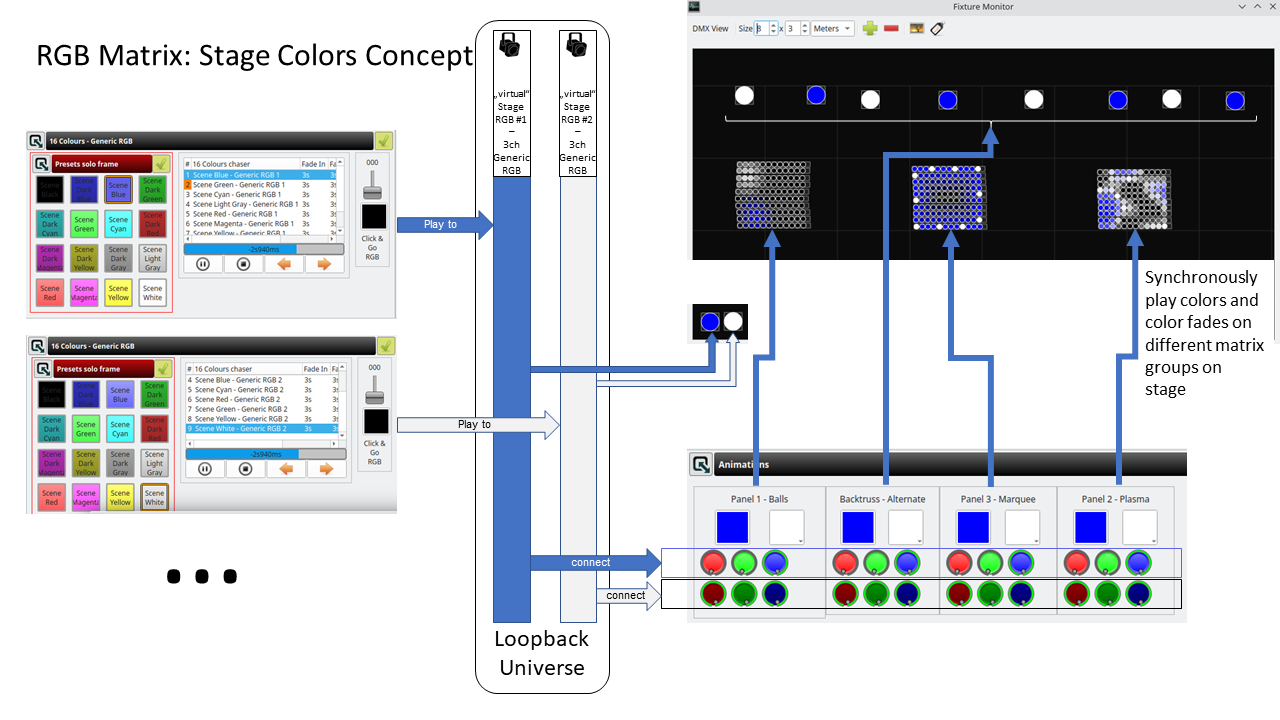
I am a visual person and a flow-chart and a diagram may help. There is a diagram on page 6, but it does not make much sense to me.
Exactly what are we doing here? Essentially, is this what is happening when we use a loopback? ...
I hit a virtual/physical button (on a screen or on a MIDI controller) >> (labelled) Turn on X light >> send signal to loopback >> main universe reads that loopback as its input >> generates a DMX signal to turn on the X light >> sends an electrical signal out to the X fixture >> X fixture turns on.
If yes, why can't we have a button in the main universe to do this; what is the need for this extra complexity? Maybe this level of complexity was needed in olden days, when large lighting consoles were mostly made of rheostats and relays. I am very confused about why so much complexity is needed for just turning on a light.
I am sorry if I come across as complaining, I do not mean to. I merely am trying to understand the philosophy/workflow of stage/DJ lighting from the perspective of a layman.
Thanks a lot for writing this document.
It seems to me this is a pretty hard concept to grasp. A newbie to stage lighting (like me) cannot wrap his head around it. There are so many concepts in there which are totally "alien" to a DJ or a regular person - e.g. what is a "Frame". Yeah, I had to look it up!
I am a visual person and a flow-chart and a diagram may help. There is a diagram on page 6, but it does not make much sense to me.
Exactly what are we doing here? Essentially, is this what is happening when we use a loopback? ...
I hit a virtual/physical button (on a screen or on a MIDI controller) >> (labelled) Turn on X light >> send signal to loopback >> main universe reads that loopback as its input >> generates a DMX signal to turn on the X light >> sends an electrical signal out to the X fixture >> X fixture turns on.
If yes, why can't we have a button in the main universe to do this; what is the need for this extra complexity? Maybe this level of complexity was needed in olden days, when large lighting consoles were mostly made of rheostats and relays. I am very confused about why so much complexity is needed for just turning on a light.
I am sorry if I come across as complaining, I do not mean to. I merely am trying to understand the philosophy/workflow of stage/DJ lighting from the perspective of a layman.
-Raj
Just a hobbyist
Just a hobbyist
-
rajdude
- Posts: 11
- Joined: Tue Apr 16, 2024 2:34 pm
- Real Name:
AH! me too!GGGss wrote: ↑Mon Oct 02, 2023 9:34 am As the Loopback Magic, for some, is the universal answer for internal 'rewiring' purposes, I think it's a big plus to give novice users an introduction to the matter.
It was in this mindset I reviewed your document.
Once you (we) got the basic content described as a step-by-step manual; you could add to the document the extension of the VC...
Those are my 2 cts.
I also thought this is a document for understanding loopback. It is NOT! Now I know. Sorry, I am looking at the wrong documentation.
So where is the documentation for understanding and implementing loopback, and also some simple examples of use cases?
-Raj
Just a hobbyist
Just a hobbyist
-
MichelSliepenbeek
- Posts: 504
- Joined: Wed Feb 08, 2023 10:24 am
- Location: Nederland
- Real Name: Michel Sliepenbeek
....., and also some simple examples of use cases?
Have a look at my posts in this thread.
A QLC Workspace is like a Bob Ross painting: "it's your world, you can create whatever you want!"
-
rajdude
- Posts: 11
- Joined: Tue Apr 16, 2024 2:34 pm
- Real Name:
thanks for trying to help me, MichelMichelSliepenbeek wrote: ↑Tue Apr 23, 2024 7:45 pm....., and also some simple examples of use cases?
Have a look at my posts in this thread.
I did download the first set of files and been trying to understand how it works, but so far, I do not get it. Maybe I am too stupid
Is there a visual or a diagram or data-flow chart which shows what is it that "easy example" is trying to accomplish?
So far, this is what I have understood and correct me if I am wrong.
Take the example of the RED button in your VC:
That button takes MIDI input from universe 2 on channel 210
Then it plays the function "Wash Red" on a toggle on/off basis.
Correct?
I guess I am not correct. Judging from what you have posted :
Wait, I do not even understand what is a "catch up".One workspace with some easy use cases.
It shows:
1. The use of a loopback slider to control Level, Time, Pan and a Crossfader.
2. The use of two loopback Buttons, to scroll through a Multi Page Frame.
The example was set up to show what you can do with one slider.
In case you want to control Level you could use the "Catch up .."option.
In case you control Time, you set the Range in your Speed Dial.
In case you control Pan, of course you should add an extra slider for tilt.
In case you use the Crossfader option, don't forget to press Play (and Stop before you return to page 1).
Umm......."Range" in your "speed dial". This is greek to me! LoL.
What is range?
What is speed dial?
Why do I need it?
Clearly, this "Easy example" is probably meant for some experienced people.
I am a total newbie and all I want to do is mentioned in this new thread I posted earlier:
viewtopic.php?t=17277
-Raj
Just a hobbyist
Just a hobbyist